Microsoft has released Service Pack 1 for Windows 7 users. You can install the sp1 update for improvements and enhancements on your Windows 7 PC. SP1 installation can be done using Windows Update feature or you can order free SP1 DVD for manual installation using disc. If for some reason SP1 installation cause an issue, you can easily uninstall and remove SP1 update from Windows 7 computer using ‘Program and Features’ option in Control Panel or using Command Prompt.
Remove SP1 using ‘Program & Features’ in Control Panel
1. On your Windows 7 computer, goto Start > Control Panel.
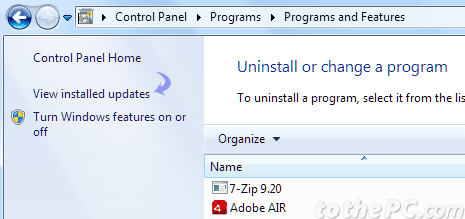
2. Then Click ‘Programs’ and ‘Programs and Features’.

3. Now click ‘View installed updates’ option at top left.
4. Click ‘Service Pack for Microsoft Windows (KB 976932)’ and then click Uninstall.
If you do not see ‘Service Pack for Microsoft Windows (KB 976932)’ in the listing of installed updates means: either your Windows 7 came with SP1 already installed (and you cannot remove it now) or SP1 was never installed on your Windows 7 computer previously.
Remove SP1 using Command Prompt
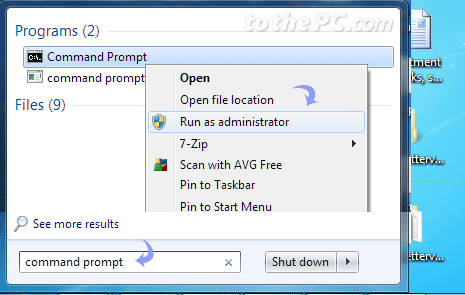
1. Click Start and type Command Prompt in the search box.
2. Right click Command Prompt listing and click ‘Run as administrator’ option.

3. In the black command prompt screen, type wusa.exe /uninstall /kb:976932 and press then Enter key.
This should uninstall and remove Service Pack 1 update from your Windows 7 computer. It is recommended to restart the PC after the SP1 uninstall.
